Sunday, December 23, 2007

FREE PATTERN: Nico Neck Piece

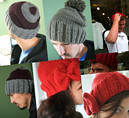
This piece was designed for my friend Nicole. She has a very distinctive style and flare. One leg in the 80’s, the other one is firmly planted in this era and even beyond. Her taste in colour is something particular and with this design I tried to make her something that reflects that. Problem with 'the style people' is that it’s often a fine line between the cool en the cold eye. But when I gave it to her on her birthday party she loved it… pheeew!

The neck piece is basically a long triangle with loop stitch on one end, a big button and a playful use of colour, nothing more.

SIZE
One size fits all

FINISHED MEASUREMENTS
Length: 29 inches/ 75 cm

MATERIALS

[MC] bright pink acrylic yarn from stash
[CC1] bright green acrylic yarn from stash
[CC2] bright citrus yellow acrylic yarn from stash
1 pair # 15 US/ #10 mm straight needles
a tapestry needle
a big button

GAUGE
8 sts/13 rows = 4 inches in stockinette stitch using 3 threads

PATTERN NOTES
The neck piece is worked from the bottom up starting with a loop stitch, going into stockinette stitch that is decreased to the top ending in an i-cord.

ML (make loop)
Row 1: (WS) K
Row 2: (RS) k1, *k1 without slipping st off left needle. Bring yarn around left thumb to form a loop, Bring yarn to back, between the needles, and k the same st again, this time slipping to right needle ( 2 st now on right needle). YO, cast off 2 st on right needle over YO, k1 * repeat
Row 3: (WS) K
Row 4: k1, *k1 without slipping st off left needle. Bring yarn around left thumb to form a loop, Bring yarn to back, between the needles, and k the same st again, this time slipping to right needle ( 2 st now on right needle). YO, cast off 2 st on right needle over YO; repeat from * to last st

Repeat these 4 rows

Used Techniques
casting on (single cast on + Double Cast-On aka Long-Tail Cast-On)
binding off
stockinette stitch
decreasing (k2tog)
loop stitch

PATTERN
Cast on 22 st using single cast on + Double Cast-On aka Long-Tail Cast-On.
Start working Fur stitch

ML using [MC]
Then add [CC1] and ML
Add [CC2] and ML

K one row
Now work st st for 23” / 60cm, at the same time;
K2tog on both sides of a row every two rows (5 times),
K2tog on both sides of a row every 4 rows (5 times)
K2tog on both sides of a row every 2 rows (once) until piece measures 16”/ 40 cm,
K2tog, K1, K2tog
Work 5 “/ 13 cm
K1, K2tog, K1
Work until piece measures 23”/ 60 cm
BO 3 stitches

FINISHING
Weave in all ends and sew on a big button just above the loops in the middle of the project.

Tie the i-cord site around the button.

----------

please let me know if you have any questions or if you think that there's a error in the pattern.

Monday, December 17, 2007

Little Columbus

While practising sit ups with daddy...


I discovered my feet...

'Well, I'll be darned...'


'Hmm, what do you suppose they're for?'


Oh and did I tell you...
I moved from my crib (I'm not even stretching my legs on the picture) to the big bed (can you see me in there?)

PS

Mommy wants me to let you know she's working on one of her 6 UFO's and hoping she can show you something soon.

Gotta go, my toys are calling!

x,

Iep

edit: There's been a lot of interest in Iep's sheep blanket, to be expected of course. The blanket and the fabric for the crib are imported from Sweden from this factory. What can I say, I'm a sucker for Swedish design...


Thursday, December 13, 2007

A Day in the Life of...

... a new mom who knits ands lives in the Netherlands, likes Dutch food and keeps her ears open for noises of her own little sprout, who reads Swedish blogs, reads up on childcare, has baked cupcakes with another lovely sprout and is not very tidy.

(if you are interested, the WIP is Quant from the last Knitty issue, great knit!)

Monday, December 03, 2007

FREE PATTERN: Space Invader

I got really inspired by Anna Hrachovec who designed the Woodins in the last Knitty issue. I fell in love with those cute creatures and wanted to design a stuffed toy myself. Other than that, I'm on ravelry now and just having one design there (and one really old one) is so, well, meagre.


I've always been a fan of the street artist 'Invader'. I like the way he uses an existing form and gives it another meaning. He takes the main characters from the 1978 arcade video game 'Space Invader', turnes them into mozaiques and then sticks them onto walls all over the world. So cool, so fun, such a friendly form of street art! Love it, love it, love it!


And so I thought it might be cool if the invaders took over the world one step further, this time 'knitty style'. So I designed knitted Space Invaders.

There's a big one and a small one, the small one is a little different. It was the first one that I knit and didn't turn out as boxy as I planned but I still like the little fellar so he can stay. Just so you know when you see the measurements beeing anything but logical. ;-)

Have fun invading!
------------------------------------------------------------------------------------------------
FREE PATTERN: Space Invader

FINISHED MEASUREMENTS
This project is great for those leftovers that can’t seem to find a suitable pattern, it really doesn’t matter how big it will turn out so use all kinds of yarn just make sure you use the needle size that’s recommended or a bit smaller so that the stitches won’t bee too loose for filling. (So you still want to make a swatch... sorry...)

MATERIALS

Any yarn you like and 1 set needles to match the yarn, these ones are made with a 60% acrylic/ 40% wool mix, worsted weight knit on 4mm needles.
a tapestry needle
stich holders
stitch markers

GAUGE
17sts x 25rows = 4"


PATTERN NOTES
The space invader is knit in one shape, folded in half, then sewn up.

Used Techniques
casting on (single cast on + Double Cast-On aka Long-Tail Cast-On)
binding off
stockinette stitch
placing stitches on a holder
simple embroidery

PATTERN
Front Body
Cast on 10 (10) st
K 10(5) rows st st
(RS) Cast on 10(5) stitches using single cast on and K to end
(WS) Cast on 10(5) stitches using single cast on and P to end
(30 st on the needle)
K 12(5) rows st st
(RS) Cast on 10(5) stitches using single cast on and K to end
(WS) Cast on 10(5) stitches using single cast on and P to end
(50 st on the needle)
K 14(15) rows st st

Legs
(RS) K 10(5) st, BO 3(4), K10(5), BO 4(5), K 10(5), BO 3(5), K10(5)
(WS) P 10(5) st, place all other st on st holder
*Continue with the 10(5) st on the needle, K 24(15) rows
Place these 10 st on second st holder
Get next 10(5) st from first holder, K 24 rows(15) *repeat 3 times
Now all 40(24) st are on the second holder
(RS) K first 10(5) st
Cast on 3(4) st using single cast on
Add next 10(5) st from second holder and k10(5)
Cast on 4(5) st using single cast on
Add next 10(5) st from second holder and k10(5)
Cast on 3(5) st using single cast on
Add next 10(5) st from second holder and k10(5)

Back Body
K 14(15) rows st st
BO 10(5) st K till end of row
Bo 10(5) st P till end of row
K 12(5) rows st st
BO 10(5) st K till end of row
BO 10(5) st P till end of row
K 10(5) rows
BO all st.

FINISHING
Using simple straight stitches embroider eyes onto front side, making sure you ALWAYS stick in the middle of the yarn to make sure that when the knitting is stretched, the embroidery stays in shape.

* don't be gentle with me, I'm learning, if you have a suggestion or a remark, let me have 'em!